Follow a complete Ergono3D workflow—from choosing the use case and collecting measurements to reviewing the design, exporting the STL, printing in TPU and recording fit feedback.
New here?
Follow the first-pair route in order: choose a use case, measure and prepare, design and review, print and finish, then complete a short fit check.
Confirm measurements, shoe space and the intended activity before you start changing settings.
2
Generate & review
Use the guided flow, then review the shape and key parameters before export.
3
Print & finish
Use a suitable TPU baseline, check the first layer and finish the pair for the shoe.
4
Fit & iterate
Wear-test thoughtfully, note what happened and make one useful change at a time.
Shape anatomyNamed zones make changes easier to compare
Review the whole shape.Use named areas to discuss what changed before you export or print.
Use this as a reference, not a prescription
Use this documentation as a design and production reference. Ergono3D does not provide medical advice, diagnosis, treatment or prescriptions. Read Safety & scope before beginning a wear test.
The first version is a baseline to learn from. Keep the workflow simple: prepare, answer the guided questions, review the shape, then make a controlled first print and fit check.
Before you begin
Choose the shoe and activity you want the first pair to serve.
Have the relevant foot and shoe measurements ready.
Plan enough room for printing, cooling, finishing and a short first wear test.
1. Generate a starting design
Open the guided Ergono3D flow and work through its inputs without chasing a perfect answer. The aim is to create a reviewable starting shape, not to solve every possible fit question on the first screen.
Check the overall outline, arch area, heel cup, forefoot shape and expected shoe volume. If something appears materially wrong, return to the input or parameter that most directly relates to it rather than changing several controls at once.
Keep a record.
Name the file, date, shoe and intended activity. This makes later fit feedback usable.
3. Export, print and learn
When the design is ready, export the STL and move into the printing guide. Keep the first material and slicer settings conservative so you can tell whether a later change came from the design or the production process.
Good inputs remove guesswork. Before designing or printing, make sure the reference measurements, intended shoe and expected use all agree with each other.
What to collect
Reference
Why it matters
Foot length and width
Helps establish a proportional starting point and avoid obvious scale errors.
Shoe model and size
Different footwear leaves different volume and changes where an insole can sit comfortably.
Intended activity
Walking, running, work shifts and hiking ask different things of the same shape.
Current insole or fit notes
Useful context for what already works, crowds the shoe or feels uncomfortable.
Check the shoe, not only the foot
Remove the existing liner where possible and look at the usable footprint, heel shape and available depth. A design that looks plausible in a preview can still be unsuitable for a shoe with limited volume.
Confirm scale before a long print
Use the intended footwear and the relevant print preview to check the length, width and thickness expectation. It is cheaper to find a scale mismatch here than after a long TPU print.
Check the footprint with a one-layer test
Before committing to a full TPU print, print only the first layer of the insole base at the final X/Y scale. This creates a quick, low-material test of whether the bottom outline is likely to sit inside the intended shoe.
One-layer footprint checkAlign the heel, then compare the perimeter
Check the bottom outline before the full print.Align at the heel and compare the plan-view perimeter without forcing or stretching the reference.
1
Prepare the reference.
Remove the shoe's existing sockliner where possible and lay it flat without stretching it. If it is not removable, use the actual internal footbed as the reference—not the outside of the shoe.
2
Print one layer at final scale.
Place the smooth underside fully flat on the virtual build plate and keep the final X/Y scale unchanged. Confirm the slicer's first-layer preview shows the complete intended footprint; if it shows only partial contact regions, do not use it as an outline check.
3
Align and compare.
Align the heel centre first, then check the heel, waist and toe perimeter. The test layer should lie flat, stay within the usable footprint and should not need to be forced into the shoe.
4
Adjust and repeat.
If an edge overhangs or buckles, revise the outline or X/Y scale and print another one-layer test before producing the full pair.
What this test does not prove.
A one-layer test checks the bottom outline and X/Y scale only. It does not confirm arch height, heel-cup depth, total thickness, top-cover room or final comfort. Complete a finished-shoe fit check before extended wear.
An insole type is a starting conversation between the wearer, their footwear and their activity. Use it to focus the design review—not as a label that replaces fit testing.
Common starting points
Use case
Start by considering
Useful guide
Everyday walking
Daily footwear, existing liner thickness and general comfort over time.
Comfort, support and printability interact. The same adjustment can feel different across shoes, materials and people, so use a clear baseline and record the context around any feedback.
Explore more starting points
Browse additional comfort- and condition-focused pages, then return here to compare the design with the intended shoe and fit check.
Parameters let you describe and review a shape more precisely. Each control changes geometry; none is a universal clinical setting or diagnosis.
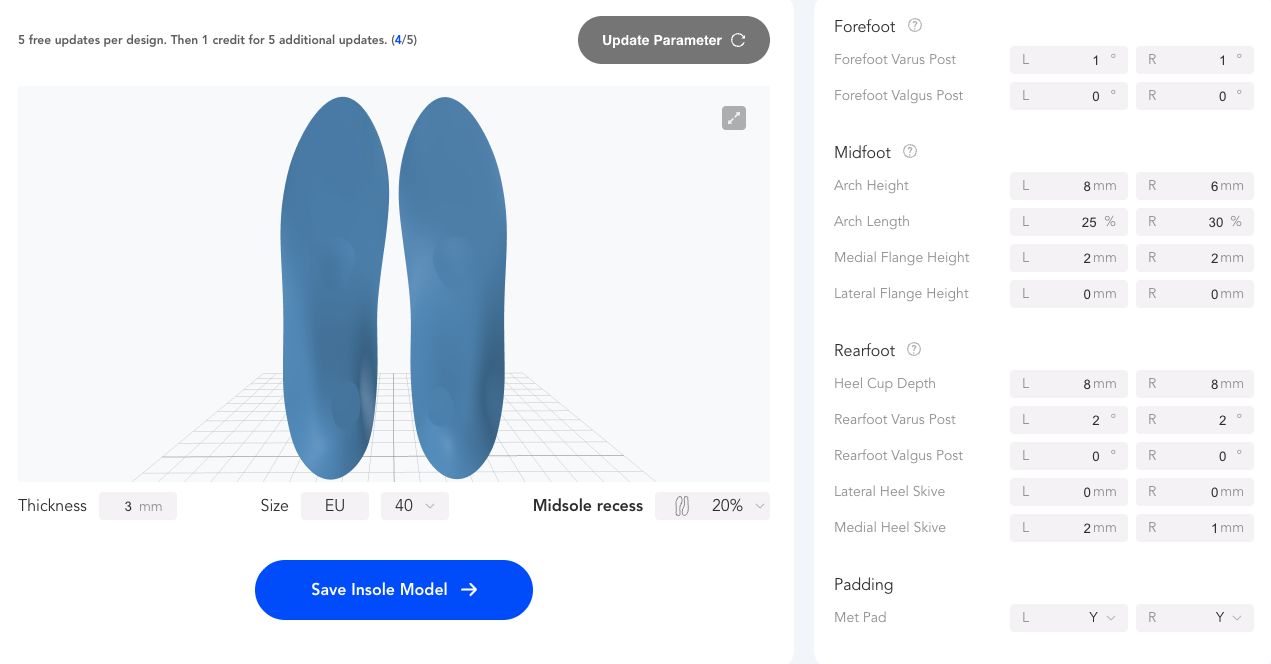
Parameter workspaceChange one control, then review the model
Keep controls and geometry together.Compare the model after each intentional parameter change.
Arch profile
Arch controls influence the contour through the midfoot. Review it alongside the wearer’s comfort, the intended shoe and the rest of the design rather than in isolation.
Heel cup & rearfoot features
Heel-related controls affect the shape around the rearfoot and the space it occupies in the shoe. Check that the design remains compatible with the footwear before increasing detail.
Posting, skive & flange
These controls change targeted parts of the shell. Make a single, intentional change, then compare it to the prior version in the same shoe and activity where possible.
Forefoot, thickness & scale
Forefoot features and overall scale affect both geometry and usable shoe volume. Re-check the expected fit whenever one of these is adjusted.
Design reference.
For a fuller explanation of each available control, use the detailed parameter reference.
The next design improves when the feedback is specific. Start with a calm, short wear test and capture the shoe, activity, location and timing of what the wearer notices.
Make a first fit check
1
Check the pair in the shoe.
Confirm it lies flat, stays in place and does not create obvious crowding.
2
Wear-test gradually.
Use the intended footwear and a controlled period before treating it as an all-day solution.
3
Record the observation.
Note where it happened, when it happened and how the feeling changed with time or activity.
Revise with one clear question
Relate feedback to the part of the design that may be responsible, then change one considered variable at a time. Keep the printed version and its notes together so the next comparison is meaningful.
Know when to stop self-adjusting
Do not use this workflow to manage persistent pain, injury or a clinical concern. Pause and consult a qualified healthcare professional where appropriate.
A downloaded STL still needs material, slicer and finishing decisions. Begin with a stable baseline, watch the first layer and make the first print a learning step rather than a production deadline.
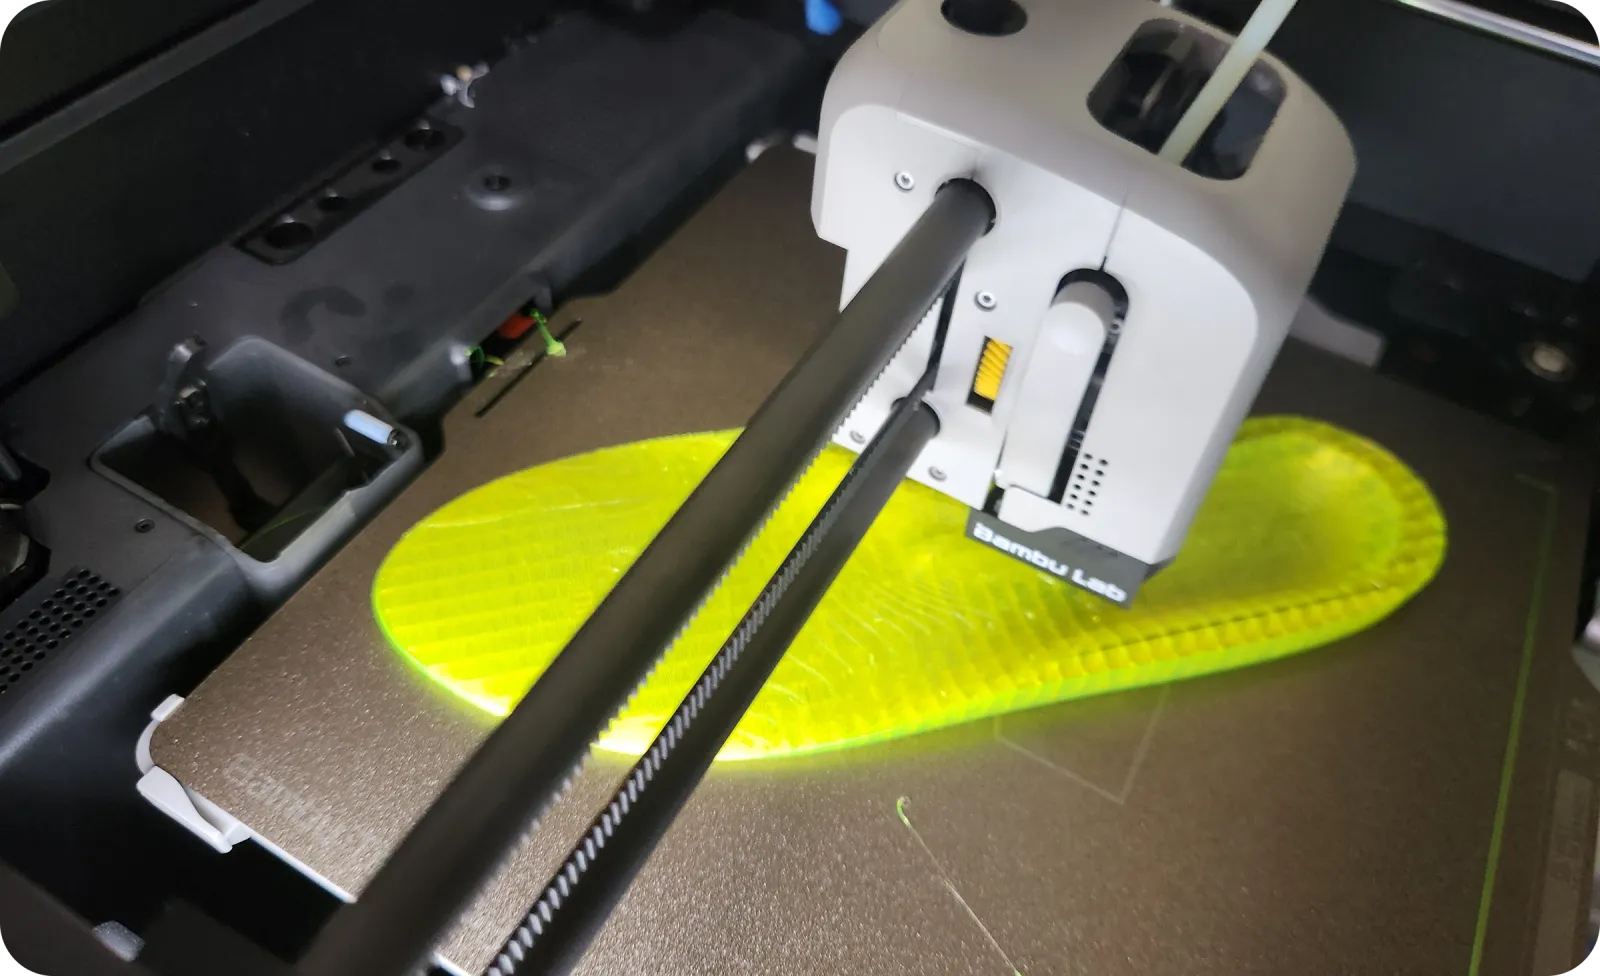
Production checkTPU print in progress
Watch the production signal.Bed adhesion and first-layer behaviour are worth checking before a long print.
Before you slice
Confirm the exported file is the intended version.
Check the expected scale against the relevant shoe and foot reference.
Choose a suitable TPU and a profile your printer can handle reliably.
Set up the slicer
Start from a tested TPU profile, then use the manufacturer’s material guidance and your printer’s known limits. Orientation, adhesion and first-layer behaviour matter more than copying a universal setting from another machine.
Watch the first layer
Stay nearby at the start. Catching poor adhesion, excessive stringing or a feeding issue early can save a long failed print and makes troubleshooting more precise.
Cool, trim and try on
Let the part cool, remove any temporary material carefully and check the edges before placing it in the shoe. A short fit check comes before extended wear.
STL Scale & Cut is a browser workbench for separating a paired Ergono3D insole file, correcting model size and orientation, making an insole Wide, or producing a 3/4-length or custom cut. Its exact scale, rotation and planar-cut controls also work with other STL or OBJ models.
Private by design.
Your STL or OBJ is processed locally in this browser and is not uploaded. The source file remains unchanged.
Choose the right starting route
For an Ergono3D file containing two disconnected insoles, begin with the pair splitter, then download either model or choose Edit below.
Model A and Model B describe the models' positions in the uploaded file, not anatomical left and right. Confirm the side before naming or printing either export.
For one insole—or any single STL or OBJ—upload it directly in Step 2.
If two models are fused into one connected body, the pair splitter cannot separate them without a cut. Open the complete model below and use a custom planar cut where appropriate.
Binary and ASCII STL and mesh-based OBJ are supported. Materials and textures are not carried into the binary STL export.
Edit and export in four steps
1
Open the model you need.
Separate a paired Ergono3D file in Step 1, or bypass the splitter and upload one STL or OBJ directly in Step 2.
2
Confirm size and orientation.
Check the displayed dimensions and source unit, then use exact scale controls and model rotation where needed. Dragging the preview changes only the view; Orient model changes the exported STL.
3
Choose an insole preset or custom edit.
Use Ergono3D Wide for local insole width, make a heel-side 3/4 insole, or position and angle a plane for a custom two-part cut.
4
Download and verify.
Export the edited binary STL, or download both parts from a split. Confirm the final dimensions and run your slicer's mesh check before printing.
Understand the edit options
Option
What it does
Best used for
Separate pair
Extracts two disconnected model bodies without adding a cut plane or cap.
Paired Ergono3D exports that contain two separate insoles.
Scale & rotate
Changes the model's finished dimensions or exported orientation.
Any printable STL or OBJ mesh.
Ergono3D Wide
Adds room mainly through the forefoot while preserving the insole's length and centre path.
Insole models that need controlled extra width.
3/4 preset
Keeps the heel-side 75% and removes the toe-side 25%. Use Swap heel / toe if the detected direction is wrong.
Creating a heel-side 3/4-length insole.
Planar cut
Positions and angles a cutting plane, then produces two separate capped STL parts.
Splitting an insole or another mesh at a chosen line.
Check units and source quality
STL files do not contain a dependable unit declaration, so confirm the imported dimensions before editing or export. Wide and the 3/4 preset are tuned for insoles; exact scaling, rotation and planar cuts can be used with other models. A clean, watertight source mesh produces the cleanest capped cut, while open edges, self-intersections or very thin triangles may remain visible in the result.
Review before production.
The workbench edits model geometry; it does not confirm clinical fit, printability or the suitability of a design for a particular person.
Material affects feel, support, printability and the available room inside a shoe. Choose a reliable baseline for the printer and expected use before testing more specialised combinations.
Choose a TPU baseline
Consideration
Question to ask
Hardness
What balance of feel, shape retention and printer handling suits this first version?
Printer capability
Has this printer and extruder run the material reliably before?
Shoe volume
Will the finished material and any top cover fit in the intended footwear?
Wear surface
Will a top cover or finishing layer make the pair more suitable for the intended shoe and use?
Top covers & finishing
A finishing layer can change feel, friction and total thickness. Keep its effect on shoe volume in mind, and test your chosen adhesive and material combination on a small, controlled sample where possible.
Compare material choices
The hardness selector is a useful starting tool; the filament maker’s specification and your printer’s observed behaviour remain important.
A failed TPU print can come from the material, printer, slicer or model setup. Start with the visible symptom, make one targeted check and record the result before changing more settings.
Common first signals
What you see
First checks
Poor first-layer adhesion
Clean bed, bed preparation, first-layer setup, material dryness and the correct profile.
Inconsistent extrusion
Filament path, extruder grip, print speed and the material condition.
Excessive stringing
Material preparation, temperature behaviour and movement/retraction settings for that printer.
Weak or uneven layers
Material, extrusion consistency, speed, cooling and the suitability of the profile.
Use a controlled retry
Change the smallest relevant setting, then repeat a short test. If several settings move at once, the result is harder to interpret and harder to reuse on the next pair.
Use Ergono3D alongside your existing assessment and production process. The platform helps turn guided inputs and named design parameters into reviewable STL files; clinical decisions remain with the qualified professional.
1. Prepare the case
Confirm the intended footwear and activity, collect the relevant measurements, and record the left and right requirements before generating a design. Use a case identifier that fits your privacy and record-keeping process.
2. Generate and review
Review the outline, arch profile, heel cup, posting, skive, flange, forefoot and available shoe space. Record the design or file version before moving to production.
For a geometric check before production, use 3D Foot Fit to compare a confirmed foot surface with the matching insole in Contour preview or Actual size 1:1.
3. Export and produce
Confirm the version, scale, material and print setup before sending the STL to an in-house printer or production partner. Keep the production settings with the case record.
4. Follow up and revise
Collect specific fit observations in the intended shoe and activity. If a revision is appropriate, change one clear variable at a time and retain the prior version for comparison.
Professional responsibility.
Ergono3D supports design-file creation. It does not replace clinical assessment, professional judgement, informed consent, record-keeping or applicable local requirements.
3D Foot Fit is a browser workbench for reviewing one foot surface against a matching insole. Import STL files, confirm the sole, align a working copy and export the result without uploading the source files.
Private by design.
Your STL files are processed locally in this browser and are not uploaded. Source files remain unchanged.
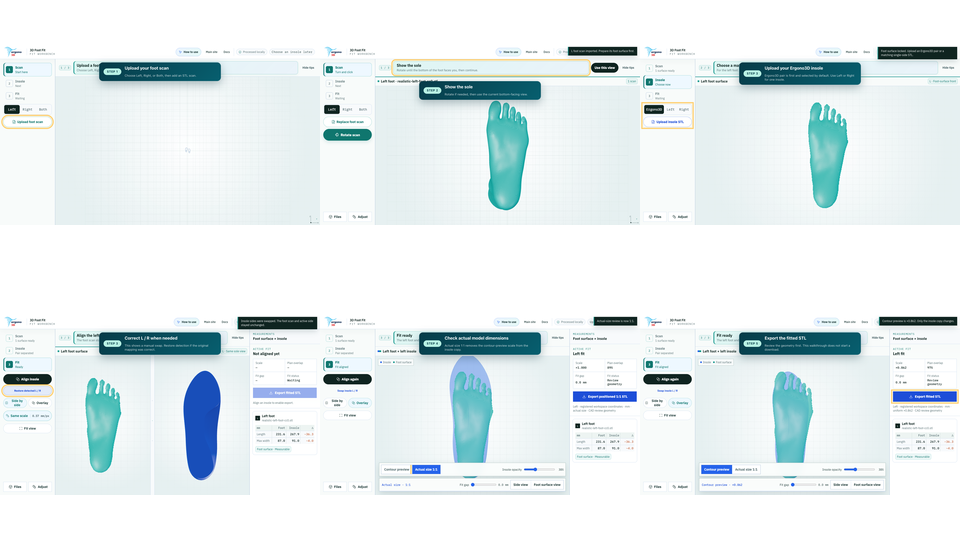
3D Foot Fit workflowFoot surface + matching insole
One guided route from scan to export.Open How to use inside the tool to play the animated walkthrough.
Prepare the right files
Use an STL foot scan and choose whether it contains the Left foot, Right foot or Both feet.
Use a paired Ergono3D insole STL, or choose Left or Right before uploading a single-side insole.
When a file contains both feet or both insoles, review one matching side at a time.
Run the five-step comparison
1
Choose the scan side.
Choose Left, Right or Both, then upload one foot-scan STL. A Both file is separated into left and right candidates.
2
Confirm the sole surface.
Rotate until the bottom of the foot faces you, select Use this view, then confirm that teal covers the sole rather than a leg, brace or scan platform.
3
Add the matching insole.
Upload a paired file for automatic L/R separation, or upload one selected side. If a pair is reversed, use Swap insole L / R before alignment; Restore detected L / R returns to automatic assignment.
4
Align and review.
Select Align insole to open the overlay. Adjust opacity, inspect the side view and compare Contour preview with Actual size 1:1.
5
Export the aligned copy.
Review length, maximum width, plan overlap, fit gap and fit status, then export the active fitted STL in millimetres.
Understand preview, 1:1 and export
STL files do not carry a dependable unit declaration. Confirm that the imported dimensions are correct before relying on measurements or export.
Mode
What changes
Export
Contour preview
Uniformly scales only the displayed insole working copy to compare its plan outline with the foot surface.
Exports the uniformly scaled, aligned insole copy.
Actual size 1:1
Removes contour-preview scaling and reviews the insole at its model dimensions. This does not physically calibrate the monitor.
Exports a positioned, true-size insole copy.
Source files
The foot scan and uploaded insole STL remain unchanged in both modes.
Only the active insole working copy is exported.
Keep the result in scope
The tool compares geometry only. It does not perform pressure analysis, gait analysis, automatic clinical fitting, diagnosis or treatment planning. Review the source quality, side assignment, scale and exported geometry before using the result in another CAD or production workflow.
Geometry review, not a clinical recommendation.
The result is not a medical diagnosis, fit prescription or substitute for qualified professional judgement.
Use the same account when you create, review and download a design. Clear project names and version notes make it easier to find the correct file later.
Sign in and open the dashboard
Sign in with the account used for the design, then open the dashboard to view the projects and history available under the current plan.
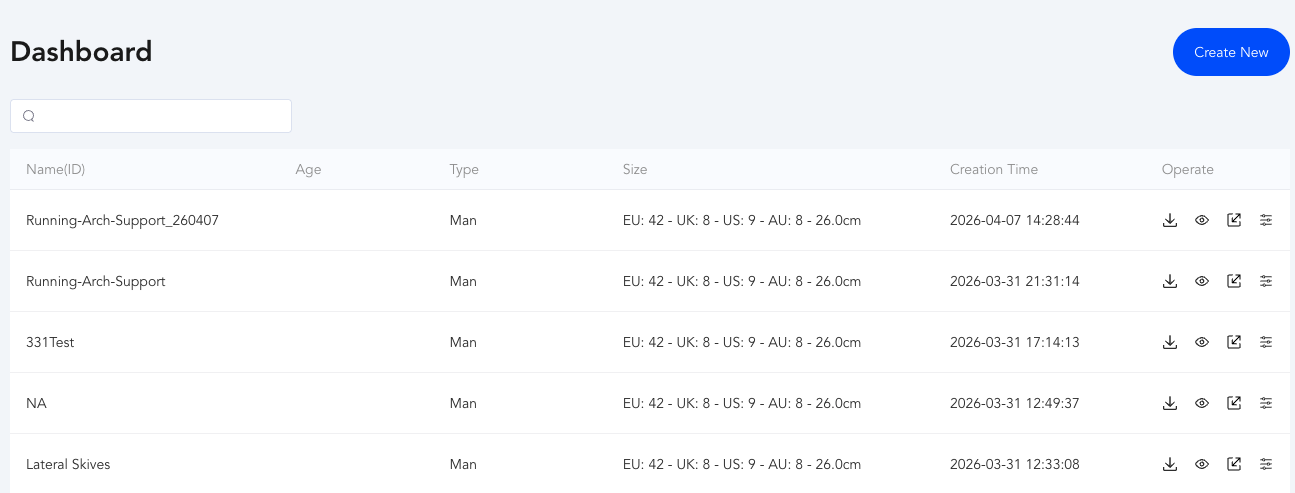
Project dashboardNames and dates help identify the intended version
Keep projects recognisable.Use clear names and dates before reopening or downloading a file.
Keep projects easy to recognise
Use a clear project name that identifies the shoe, activity and version. Before continuing an older design, confirm that the measurements, intended footwear and latest notes still apply.
Download the intended version
Open the relevant design and verify its version before downloading or sending an STL to production. Download availability, saved history and re-download options depend on the current plan and credit rules.
Access, payment or credit issue?
Include the account email and a concise description of the issue when contacting support. Never send a password or complete payment-card details.
1 credit starts a new insole design and includes 5 design updates.
After those 5 updates, 1 additional credit unlocks 5 more updates.
On Lite, each credit includes 1 STL export and 5 updates.
Free Preview users can add one STL download for A$9.90 without buying a credit pack.
Lite and Pro credits are valid for 3 months. Studio credits are valid for 6+ months.
Pricing is the source of truth.
Check current prices, availability, download rules and validity before purchase.
Need help choosing?
If you are planning a lab, clinic or high-volume workflow, share the approximate volume and how you intend to use the output. The team can point you to the most suitable current option.
Ergono3D is a design tool for comfort-focused and sport-wellness insole work. It is not a medical device and does not provide medical diagnosis, treatment, prescriptions or clinical advice.
When to seek qualified care
Consult a qualified healthcare professional for acute or persistent pain, a recent injury, circulatory concerns, neuropathy, a non-healing wound, reduced sensation, or any concern involving skin integrity. Do not continue self-adjustment when clinical assessment is needed.
Stop use if something feels wrong
Discontinue use and seek professional advice if discomfort or symptoms persist. A printed insole should be checked for scale, shoe space, surface condition and comfort before extended wear.
Professional use
Qualified professionals remain responsible for assessment, clinical decisions, manufacturing, labelling, record-keeping and compliance with applicable local requirements.