TL;DR
Once Ergono3D has generated your insole, two choices decide how it feels: the TPU hardness you print at, and the top cover you glue on. Tune firmness to your activity — softer for everyday, medium for run-and-jump sport, firmer for load-bearing, and very firm for heavy strength work — using both the TPU and the print's internal structure. Then finish with a top cover: EVA (a well-rounded default, ~25–40 Shore C, 2–3 mm), Poron (durable cushioning that holds up), supercritical foam, or leather for dress shoes. Glue it with a flexible adhesive — never super glue — and bond from the heel cup forward so it lies flat. It is a DIY comfort-and-support product, not a medical device.
Key takeaways
- Firmness comes from both the TPU durometer and the printed internal structure — adjust either to change support and rebound.
- Match hardness to activity: softer for everyday, medium for run-and-jump, firmer for load-bearing, near-non-deforming for heavy strength work.
- A top cover is the part your foot touches — it adds comfort, manages sweat and friction, and (by material) cushioning or rebound. It's thin, so it doesn't undo the shell's support.
- EVA is the all-rounder; Poron for durable cushioning; supercritical foam for energy return if you can get it thin; leather for dress shoes.
- Glue with a flexible adhesive (not super glue), coat both sides, and bond from the heel cup forward for a wrinkle-free finish.
Three steps from survey to wearable insole.
Designing the insole is the quick part. This guide is about the two material decisions that turn a printed shell into something you actually want to wear.
The DIY path with Ergono3D is short:
- Design it. Complete the guided online survey so the system can generate an insole from your foot profile, use scenario, and comfort goals. (New to it? See how Ergono3D works.)
- Fine-tune it. Adjust the parameters on the generated model — what each one does is covered in understanding insole design parameters.
- Print and finish it. Print in TPU, then add a top cover. That last step — hardness and cover — is what the rest of this guide is about.
For the full print walkthrough (slicer settings, TPU handling, troubleshooting), see how to make your own custom insoles at home. This guide goes deeper on the two decisions that most change how the insole feels.
Choosing TPU hardness by activity.
TPU is our recommended material for DIY insoles because its performance is well balanced — it can cover a wide range of insole behaviour. And firmness is not just the filament: you also tune it through how the print's internal structure is arranged.
Because you control firmness through both the TPU hardness and the printed lattice density, you can dial the same design from plush to rigid. The right point on that range depends on what you'll do in the insoles:
| Use case | Firmness | Why |
|---|---|---|
| Everyday life | Softer | Some support, but prioritise cushioning and comfort for casual standing and walking. |
| Run-and-jump sport | Medium | Balance support, cushioning, and rebound — firm enough to avoid the energy loss of a too-soft insole, so you don't bleed push-off efficiency. |
| Light load, long duration (e.g. backpacking) | Medium–firm | The load is moderate but the time on feet is long, so support has to hold without packing out. |
| Heavy strength work (Olympic / powerlifting) | Very firm, near non-deforming | Under maximal load you want a stable, near-zero-deformation base for force transfer. |
Why a top cover matters.
Printing the shell isn't the last step. Adding a top cover is what makes the insole comfortable to wear all day.
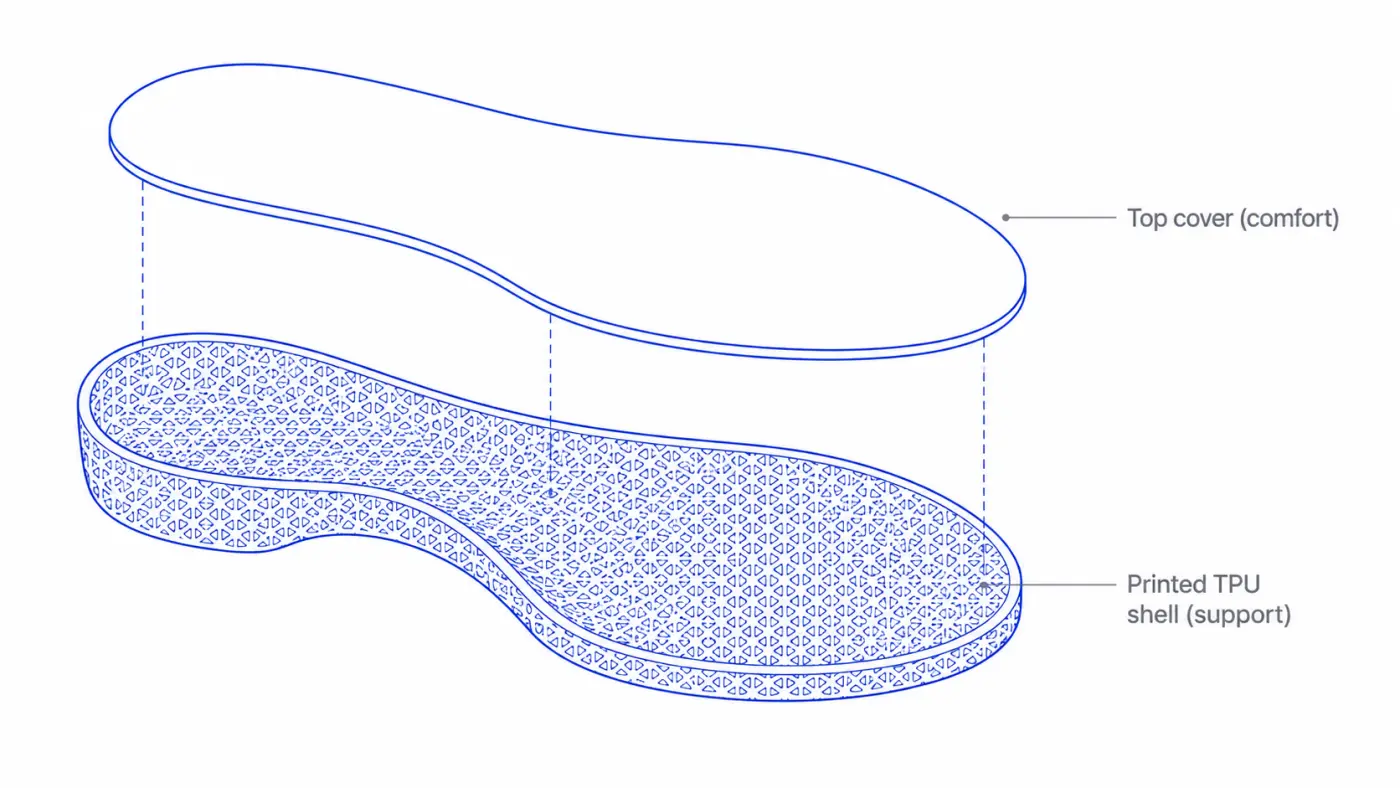
A top cover — a thin layer bonded to the top of the printed shell — substantially improves wearing comfort, and different cover materials can support different performance goals on top of that. Think of the printed TPU as the structural orthotic and the cover as the surface your foot actually contacts: it handles comfort, sweat, and friction, while the shell underneath does the support.
Because the cover is thin, it generally should not be too hard — a thin firm layer won't undo the shell's support, and a thin soft layer adds comfort without collapsing the structure. That's why the cover is mostly a comfort-and-feel decision layered on top of a support decision you already made in the shell.
Top cover materials, from default to performance.
Start with the all-rounder, then step up only if your use case calls for it.
EVA — the well-rounded default
EVA is an excellent, unglamorous choice. Its rebound isn't top-tier, but everything around it is well covered: it's comfortable, breathable, and tear-resistant, with a wide range of hardness options. (EVA is serious material, not a budget compromise — some elite marathon racing shoes use supercritical mid-soles that are EVA-based foams.) For an insole top cover specifically, a softer EVA is usually best: because the cover layer is thin, a soft cover keeps comfort without compromising the shell's support. A common starting point is roughly 25–40 Shore C at 2–3 mm thick.
Poron — durable cushioning that holds up
If your insole is for serious athletic training or long days on your feet and you want cushioning that lasts, Poron is a strong pick. It absorbs impact well and resists packing out (compression set), so it keeps its feel over time, while staying light and easy to buy. It's the upgrade when durable, consistent cushioning matters more than all-day plushness.
Supercritical foams — if you can get them thin
Now that racing shoes have moved into the supercritical-foam era, insole-grade supercritical sheets exist too. These foams are prized for their light weight and high energy return. If you like that material and can source it thin enough, it can work as a top cover. One caution: buy a slightly oversized piece, because you can't bond it perfectly aligned to the edge — you'll trim the overhang (covered in the gluing steps below).
Leather — for dress shoes
If the insole goes into dress shoes, a leather top cover is a fitting, low-bulk option that looks and feels right in that context.
How to glue the cover on — cleanly.
With the material chosen, the only thing left is bonding it without wrinkles. The technique is simple, but the order matters.
For glue, use an EVA-type DIY adhesive or a soft industrial glue. Do not use fast-setting super glue (cyanoacrylate): it's too rigid for a part that flexes with every step, and it sets before you can align the cover. Then:
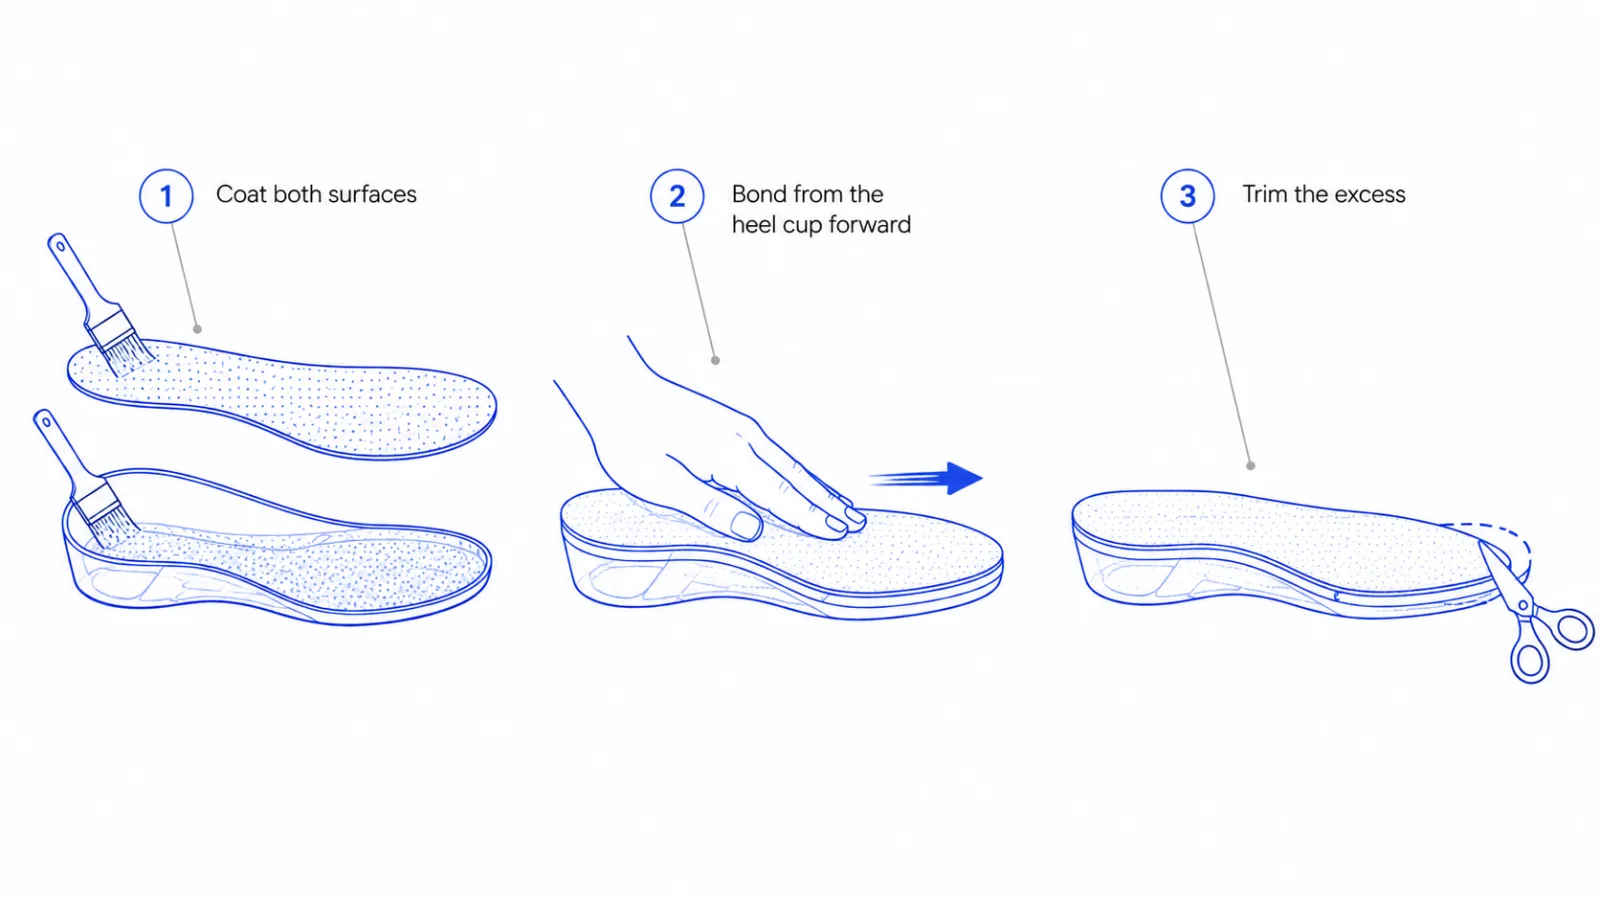
- Coat both surfaces. Apply glue to both the shell and the back of the cover, and let it tack off (dry to the touch) before bonding.
- Start at the heel cup. This is the key move. To get the cover flat and wrinkle-free, begin bonding at the heel, press the cover firmly all the way around the heel cup first, then work forward toward the toe, smoothing as you go.
- Press it all down, then trim the excess overhang flush around the edge. Done — you've got a pair of insoles that are genuinely your own.
If you've ever applied a screen protector or a vinyl wrap, the instinct is the same: anchor one end, then roll the rest down so the air and wrinkles push out ahead of you. The heel cup is the curved, unforgiving part, so seating it first makes the flat forefoot easy.
Answer a short guided survey, fine-tune the parameters, and export a print-ready STL — then print in TPU and finish it with the cover that suits your activity. Free preview, no card required.
FAQs on TPU hardness and top covers.
What TPU hardness should I use for a 3D-printed insole?
It depends on what you do in them, and you also tune firmness through the print's internal structure, not just the filament. As a rough map: a softer setup for everyday wear (support with cushioning and comfort), medium for run-and-jump sport (support and rebound without going so soft that you lose push-off efficiency), firmer for load-bearing like long backpacking, and a very firm, near-non-deforming setup for heavy strength work such as Olympic weightlifting or powerlifting. TPU is a good general-purpose insole material because it spans this range well.
Does a 3D-printed insole need a top cover?
For real-world wear, yes. The printed TPU shell is the structural part that supports the foot; the top cover is the thin layer your foot actually contacts. A cover greatly improves comfort, manages sweat and friction, and — depending on the material — can add cushioning or rebound. Because the cover is thin, it does not change the shell's underlying support.
What is the best top cover material for an insole?
EVA is the well-rounded default — comfortable, breathable, tear-resistant, and available in many hardness and thickness options; for an insole cover, a soft EVA around 25–40 Shore C at 2–3 mm is a common choice that does not compromise the shell's support. For long-wearing cushioning that resists packing out, Poron is a strong pick (durable, light, easy to buy). Thin supercritical-foam sheets bring high energy return if you can source them thin enough. Leather suits dress shoes.
What glue should I use to attach an insole top cover?
Use an EVA/contact-type DIY adhesive or a soft industrial glue. Do not use fast-setting super glue (cyanoacrylate): it is too rigid for a flexing insole and sets before you can align the cover. Coat both surfaces, let them tack off, then bond starting from the heel cup and working forward so the cover lies flat without wrinkles.
Is a 3D-printed insole a medical device?
No. A DIY 3D-printed insole made through Ergono3D is a comfort-and-support product you design and print yourself; it is not a diagnosis or treatment, and it does not replace clinical care. If you have a confirmed foot condition, an injury, diabetes, or persistent pain, get a professional assessment before relying on a self-made insole.
Next: how to make your own custom insoles at home · understanding insole design parameters · insoles for running.